
Settings
All platform settings — general, SMTP, social login, theme, player, ads, pages, and more.
Settings
The Settings section controls every platform-wide configuration option — from your site name and logo to email delivery, social login, advertising, and the video player. Most settings require admin credentials to access. Settings that affect the entire platform are marked with an IT callout.
Note: IT / Installer: Complete all settings in this chapter during initial platform setup. Changes to Site Name, Logo, Platform ID, and SMTP configuration affect the entire platform and all viewers.
General Settings (/admin/general_settings)
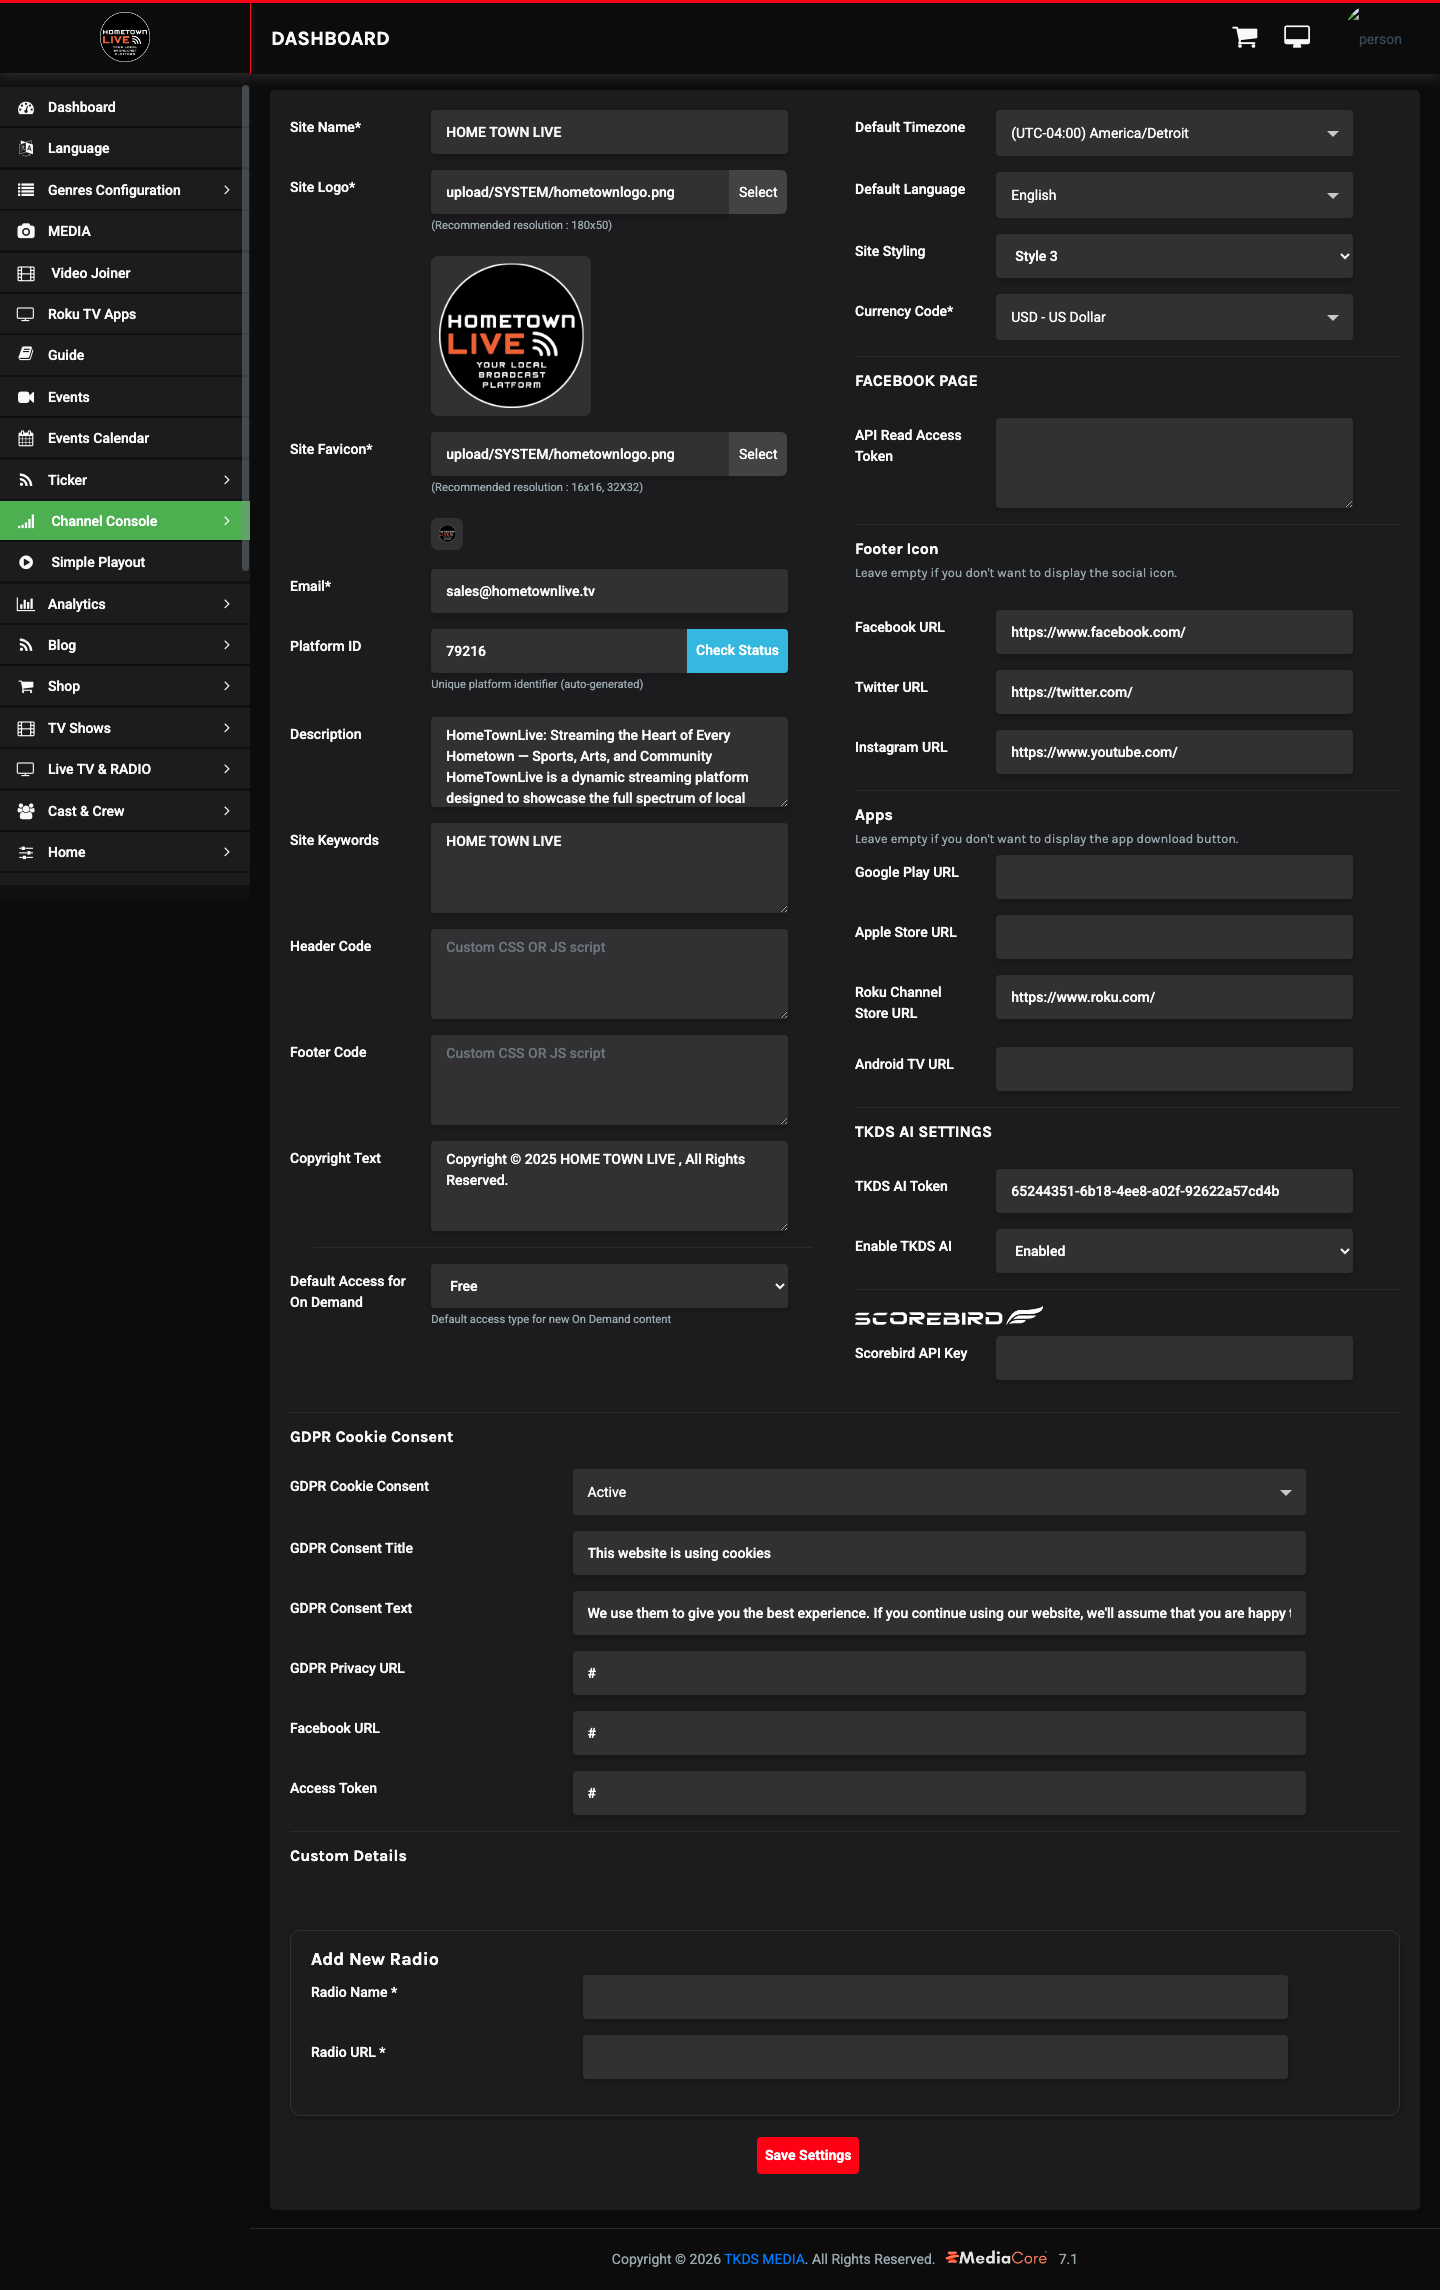
General Settings define the identity and behavior of your HometownLive platform. These are the foundational settings that influence how the site appears to viewers and how it interacts with external services.
Site Identity
| Field | Description | Notes |
|---|---|---|
| Site Name | The name of your platform displayed in the browser title bar and throughout the viewer-facing site. | Use your school or organization name (e.g., "Riverside High Athletics Live"). |
| Site Logo | Your organization's logo, displayed in the site header. | Recommended size: 180×50 px. PNG with transparent background works best. |
| Site Favicon | The small icon that appears in the browser tab. | Recommended size: 16×16 or 32×32 px. Use a simplified version of your logo. |
| The admin contact email address for the platform. | Used for platform notifications and displayed on contact forms. | |
| Platform ID | A unique auto-generated identifier for this platform instance. | Click Check Status to verify the platform is registered and active. |
| Description | A brief description of your platform, used in search engine metadata. | Keep this under 160 characters for best SEO results. |
| Site Keywords | Comma-separated keywords for search engine optimization. | Include your school name, city, sport types, and "live streaming". |
| Copyright Text | The copyright statement displayed in the site footer. | Example: © 2025 Riverside Unified School District. All rights reserved. |
Custom Code Injection
| Field | Description |
|---|---|
| Header Code | HTML or JavaScript inserted into the <head> of every viewer-facing page. Use for analytics tracking codes, custom fonts, or third-party scripts. |
| Footer Code | HTML or JavaScript inserted just before the closing </body> tag on every page. Use for chat widgets, additional tracking, or custom scripts. |
Warning: Incorrect HTML or JavaScript in Header Code or Footer Code can break the viewer-facing site for all users. Test changes in a staging environment or during low-traffic hours if possible.
Content Defaults
| Field | Options | Description |
|---|---|---|
| Default Access for On-Demand | Free / Paid | Sets the default access type when creating new on-demand content. Paid requires viewers to purchase or subscribe. |
| Default Timezone | UTC dropdown (full list) | The timezone used for event start times and scheduling throughout the platform. |
| Default Language | Language dropdown | The default interface language for the viewer-facing site. |
| Currency Code | Currency code (e.g., USD) | The currency used for pricing throughout the shop and PPV purchases. |
Note: IT / Installer: Set the Default Timezone during initial setup to match your organization's local timezone. Event times are stored relative to this setting.
Styling
The Styling field accepts custom CSS that is applied globally to the viewer-facing site. Use this for minor visual adjustments that cannot be achieved through Theme Colors alone.
Note: IT / Installer: Custom CSS overrides platform default styles. Document any custom rules added here so future administrators can identify the source of styling changes.
API Integrations
| Field | Description | Notes |
|---|---|---|
| TMDB API Key | API key from The Movie Database (TMDB). Used to retrieve metadata (posters, descriptions) for movie and show content. | Obtain from themoviedb.org/settings/api. Required only if you use TMDB-sourced content. |
| ScoreBird API Key | API key that connects your HometownLive platform to ScoreBird for live score data. | Obtain from your ScoreBird account. This key enables the ScoreBird scoring overlay on events. |
Facebook Integration
Use the FACEBOOK PAGE section to connect your organization's Facebook page for live radio or additional social embedding.
| Field | Description |
|---|---|
| Facebook URL | The full URL to your organization's Facebook page. |
| Access Token | A Facebook page access token used for API calls. Obtain from the Facebook Developer portal. |
| Radio Name | The display name for your Facebook-connected radio stream. |
| Radio URL | The stream URL for the Facebook-connected radio station. |
Footer Social Icons and App Links
Enter the full URLs for your social media profiles and app store listings. These appear as icons in the site footer.
| Field | Description |
|---|---|
| footer_fb_link | Facebook page URL. |
| footer_twitter_link | Twitter/X profile URL. |
| footer_instagram_link | Instagram profile URL. |
| footer_google_play_link | Google Play Store listing URL for your Android app. |
| footer_apple_store_link | Apple App Store listing URL for your iOS app. |
| footer_roku_store_link | Roku Channel Store listing URL. |
| footer_android_tv_link | Android TV app listing URL. |
TKDS AI Settings
| Field | Description |
|---|---|
| tkds_ai_token | API token for the TKDS AI assistant integration. |
| enable_tkds_ai | Toggle On to activate the TKDS AI assistant features on the platform. |
Note: IT / Installer: The TKDS AI token is provided by TKDS Media during platform provisioning. Do not share this token externally.
GDPR Cookie Consent
| Field | Options | Description |
|---|---|---|
| gdpr_cookie_on_off | On / Off | Toggle On to display a cookie consent banner to viewers in regions subject to GDPR. |
| gdpr_cookie_title | Text | The heading shown in the cookie consent banner. |
| gdpr_cookie_text | Text | The body text explaining your cookie use policy. |
| gdpr_cookie_url | URL | Link to your full privacy/cookie policy document. |
SMTP Email (/admin/email_settings)
SMTP settings configure the outbound email server that the platform uses to send account registration confirmations, password reset emails, and order notifications.
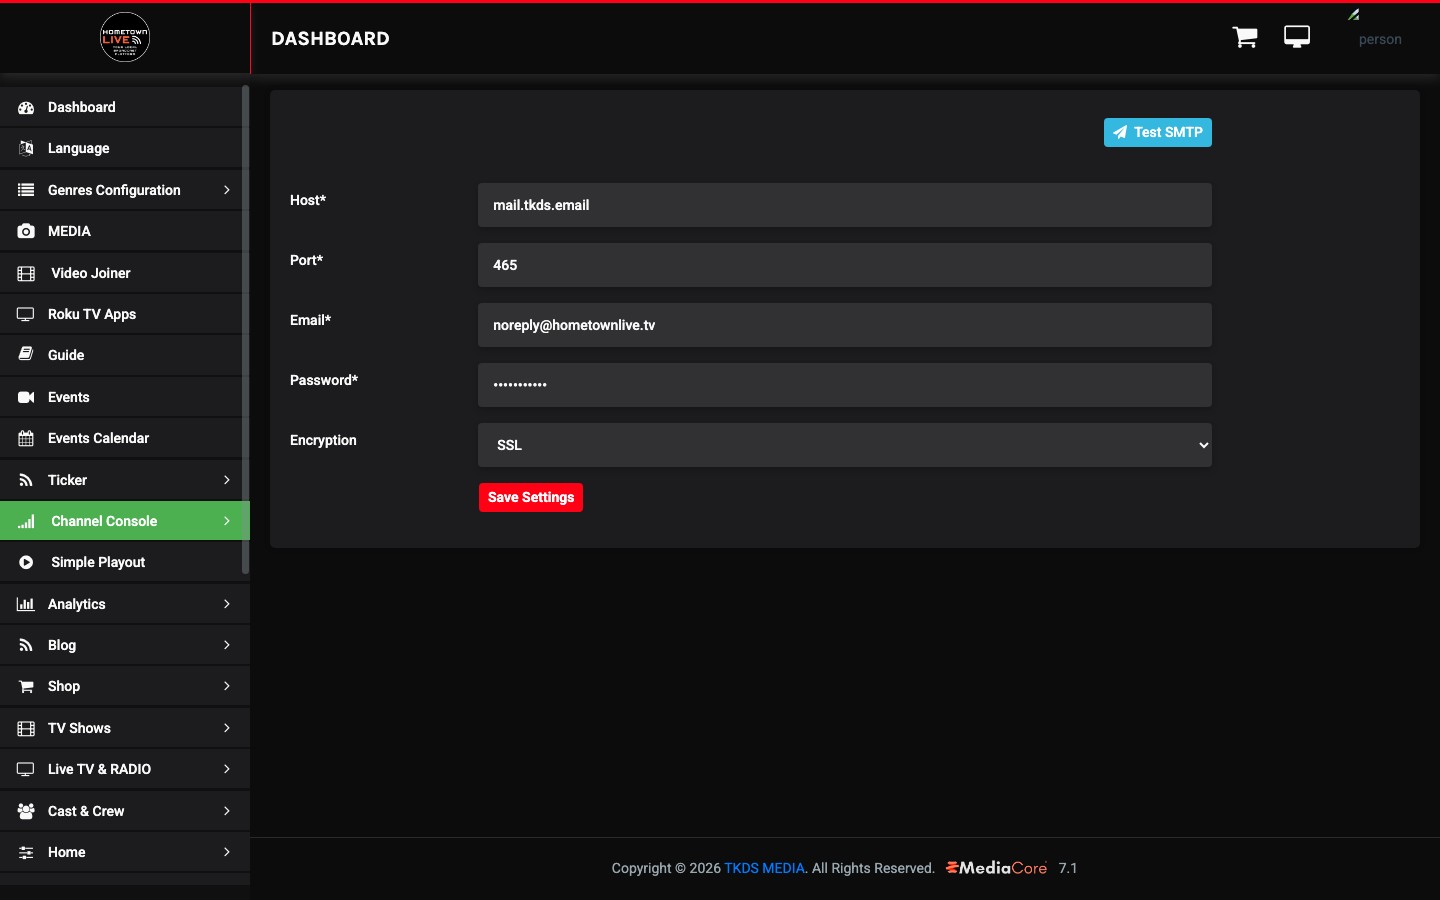
Note: IT / Installer: SMTP must be configured before viewers can register accounts, reset passwords, or receive order confirmations. Use your organization's SMTP relay or a transactional email service such as SendGrid or Mailgun.
| Field | Description | Notes |
|---|---|---|
| Host | The SMTP server hostname. | Example: smtp.sendgrid.net or smtp.office365.com. |
| Port | The SMTP port number. | Common values: 587 (TLS), 465 (SSL), 25 (unencrypted — not recommended). |
| The sender email address displayed on outbound messages. | Use a no-reply address such as noreply@yourdomain.edu. | |
| Password | The SMTP authentication password or API key. | Store this securely. It is masked in the admin panel. |
| Encryption | TLS or SSL | Use TLS (port 587) unless your provider requires SSL. |
Testing SMTP Configuration
- Fill in all SMTP fields.
- Click Test SMTP.
- Check the admin email inbox for a test message.
- If the test email does not arrive within 2 minutes, verify the host, port, credentials, and firewall rules.
Tip: Run the SMTP test after any credential change to confirm email delivery is working before viewers attempt to register or reset passwords.
Social Login (/admin/social_login_settings)
Social Login allows viewers to create accounts and log in using their existing Google or Facebook credentials instead of a separate username and password.
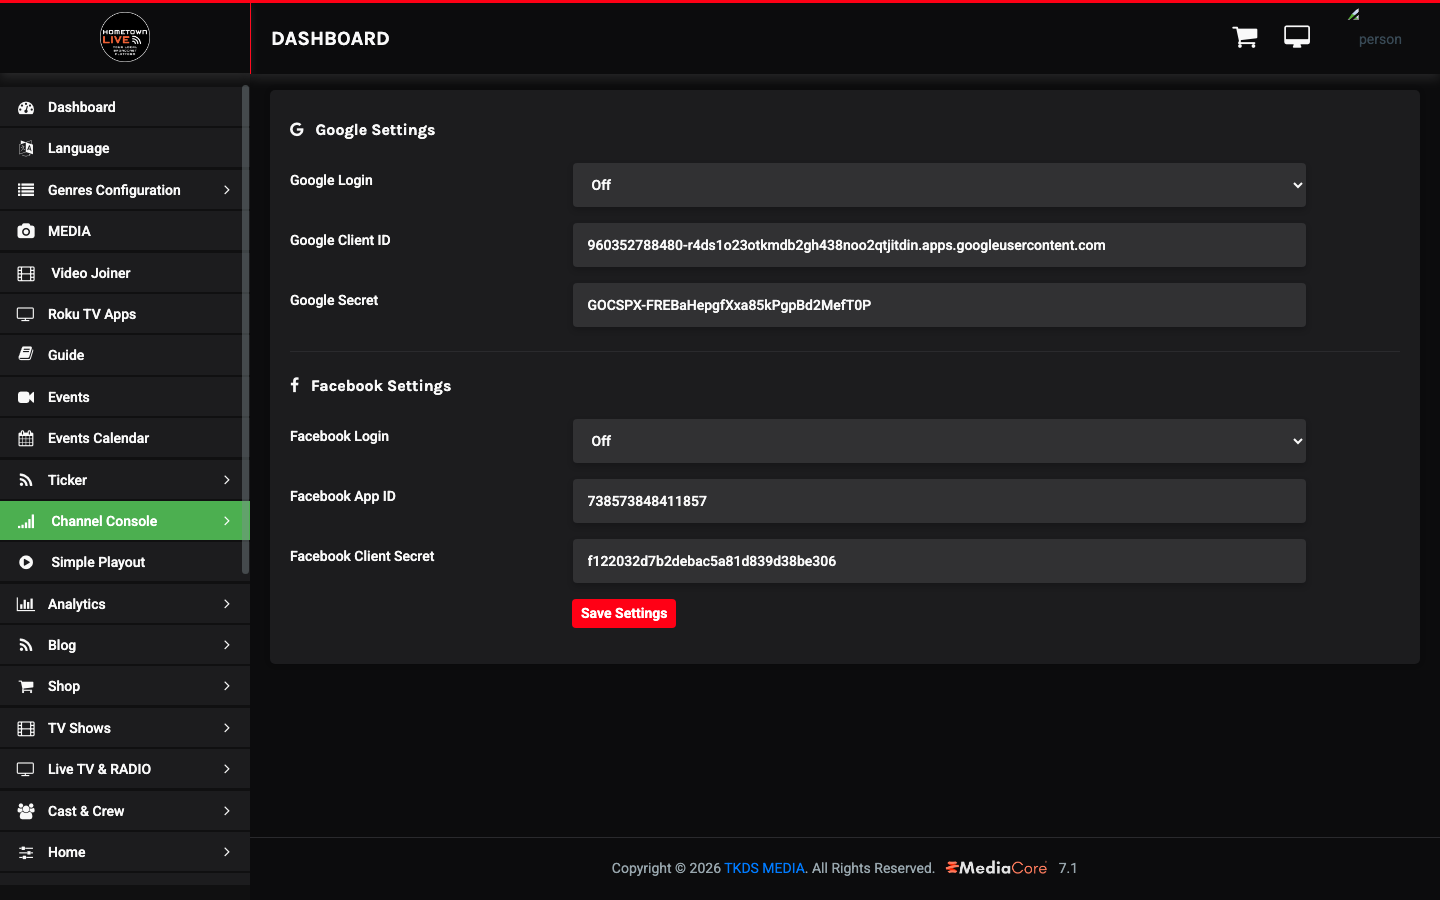
Note: IT / Installer: Social login credentials are obtained from the Google Cloud Console (console.cloud.google.com) and Facebook Developer portal (developers.facebook.com). Each platform requires your domain to be whitelisted as an authorized redirect URI.
Google Login
| Field | Description |
|---|---|
| On/Off Toggle | Enable or disable Google Login for viewer accounts. |
| Google Client ID | The OAuth 2.0 client ID from your Google Cloud Console project. |
| Google Secret | The OAuth 2.0 client secret from your Google Cloud Console project. |
Facebook Login
| Field | Description |
|---|---|
| On/Off Toggle | Enable or disable Facebook Login for viewer accounts. |
| Facebook App ID | The app ID from your Facebook Developer portal app. |
| Facebook Client Secret | The app secret from your Facebook Developer portal app. |
Menu (/admin/menu_settings)
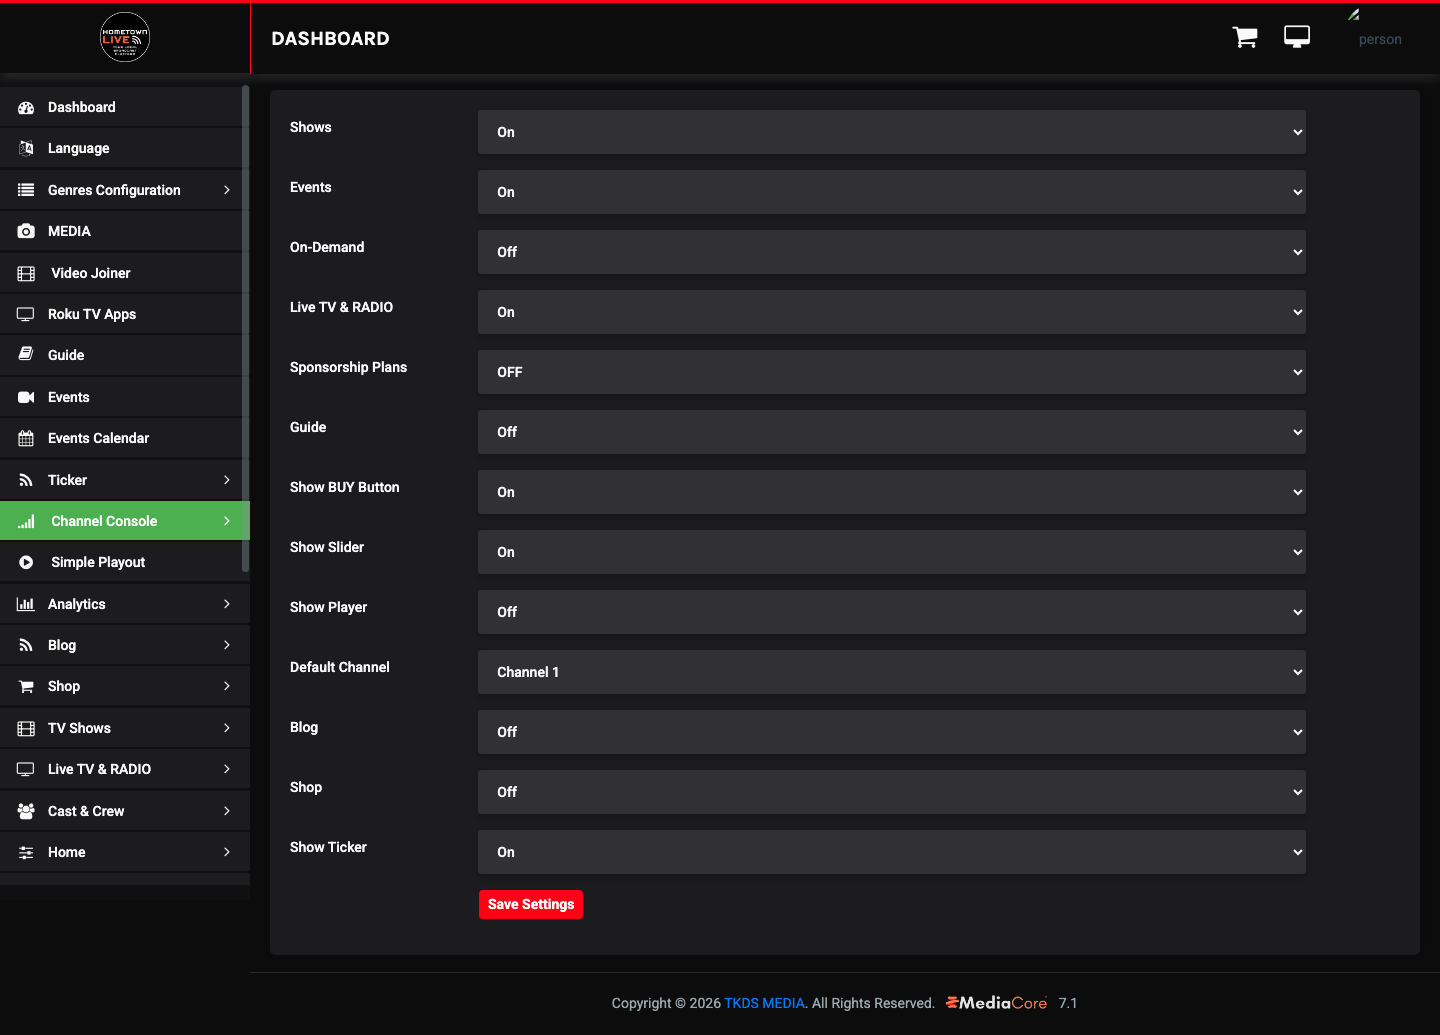
Menu Settings control which sections appear in the viewer-facing navigation. Disabling a menu item removes the link from the navigation bar and prevents viewers from browsing that section.
| Menu Item | Options | Description |
|---|---|---|
| Shows | On / Off | TV Shows section — seasons, episodes, and on-demand series. |
| Events | On / Off | Events listing — live and on-demand individual events. |
| On-Demand | On / Off | Dedicated on-demand video library section. |
| Live TV & RADIO | On / Off | Live TV channels and radio streams page. |
| Sponsorship Plans | On / Off | Viewer-facing sponsorship or subscription plan listings. |
| Guide | On / Off | Program guide showing scheduled content. |
| Show BUY Button | On / Off | Displays the purchase/buy button on events and content that require payment. |
| Show Slider | On / Off | Enables the featured content slider on the home page. |
| Show Player | On / Off | Enables the persistent player displayed on the home page. |
| Default Channel | Channel 1–4 | The channel that auto-plays in the home page player when a viewer arrives. |
| Blog | On / Off | Blog section — articles, announcements, and posts. |
| Shop | On / Off | Merchandise shop — products, categories, and checkout. |
| Show Ticker | On / Off | Enables the scrolling ticker displayed across the viewer-facing site. |
Note: Disabling a menu item does not delete the content — it only removes the navigation link. Re-enable the toggle to restore access.
reCAPTCHA (/admin/recaptcha_settings)
reCAPTCHA adds bot protection to public forms on the viewer-facing site. Use the Site Key and Secret Key from your Google reCAPTCHA console.
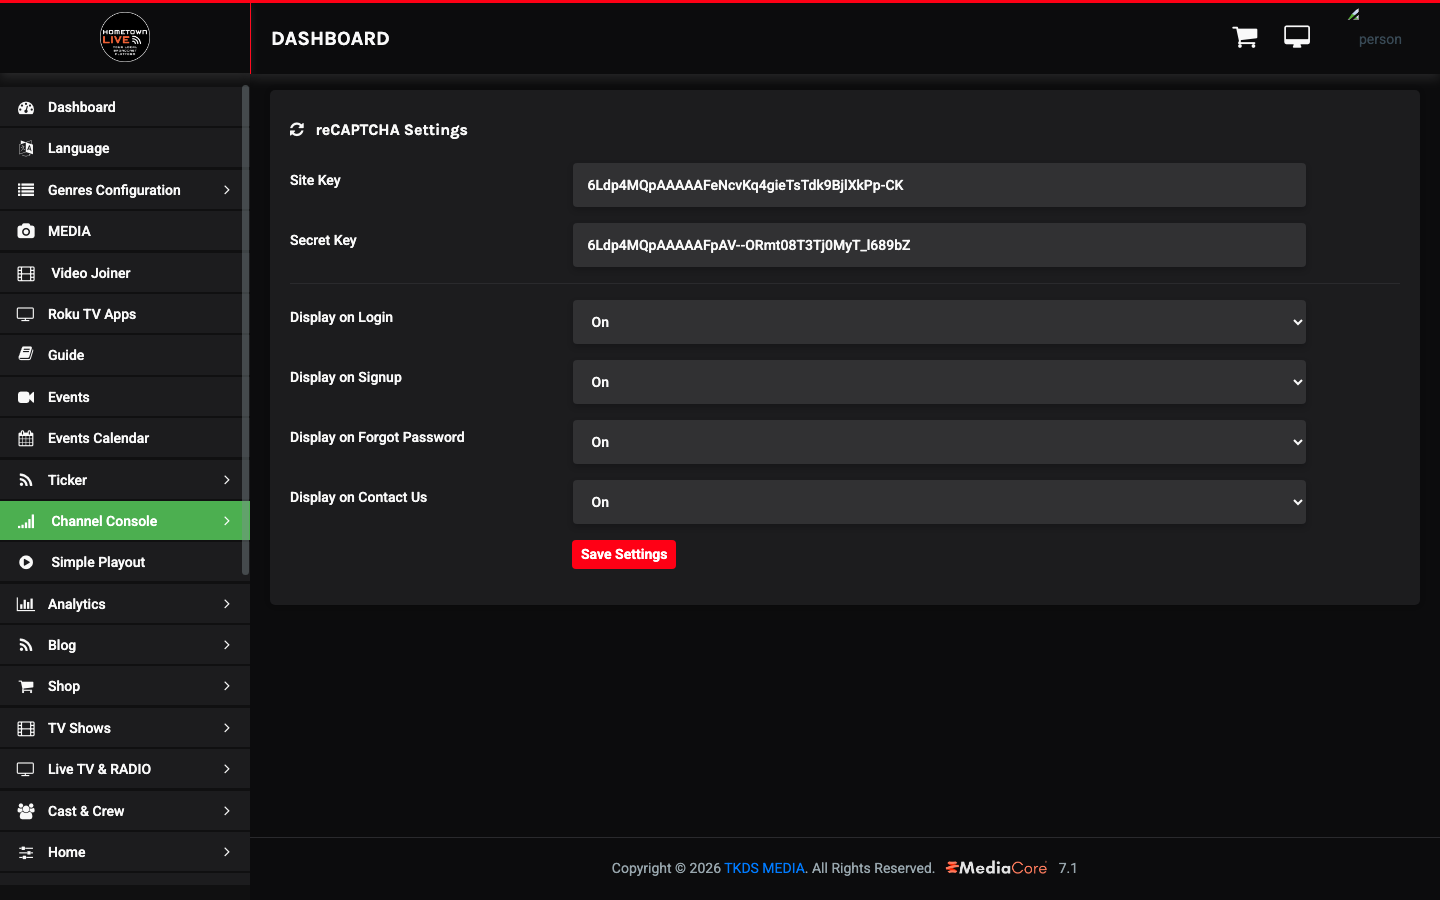
Note: IT / Installer: Obtain your reCAPTCHA v2 keys from
google.com/recaptcha/admin. Your site domain must be registered with Google before the keys will work.
| Field | Description |
|---|---|
| Site Key | The public key used in the viewer-facing form widget. Safe to expose in HTML. |
| Secret Key | The private key used on the server to verify reCAPTCHA responses. Keep this confidential. |
| Display on Login | Toggle On to add reCAPTCHA to the viewer login form. |
| Display on Signup | Toggle On to add reCAPTCHA to the viewer registration form. |
| Display on Forgot Password | Toggle On to add reCAPTCHA to the password reset form. |
| Display on Contact Us | Toggle On to add reCAPTCHA to the Contact Us form. |
Tip: Enable reCAPTCHA on Signup and Login at minimum. These are the highest-risk forms for automated abuse.
Website Banner Ads (/admin/web_ads_settings)
Banner ads allow you to display sponsor or promotional content in eight positions across the viewer-facing site. Each position supports three content types.
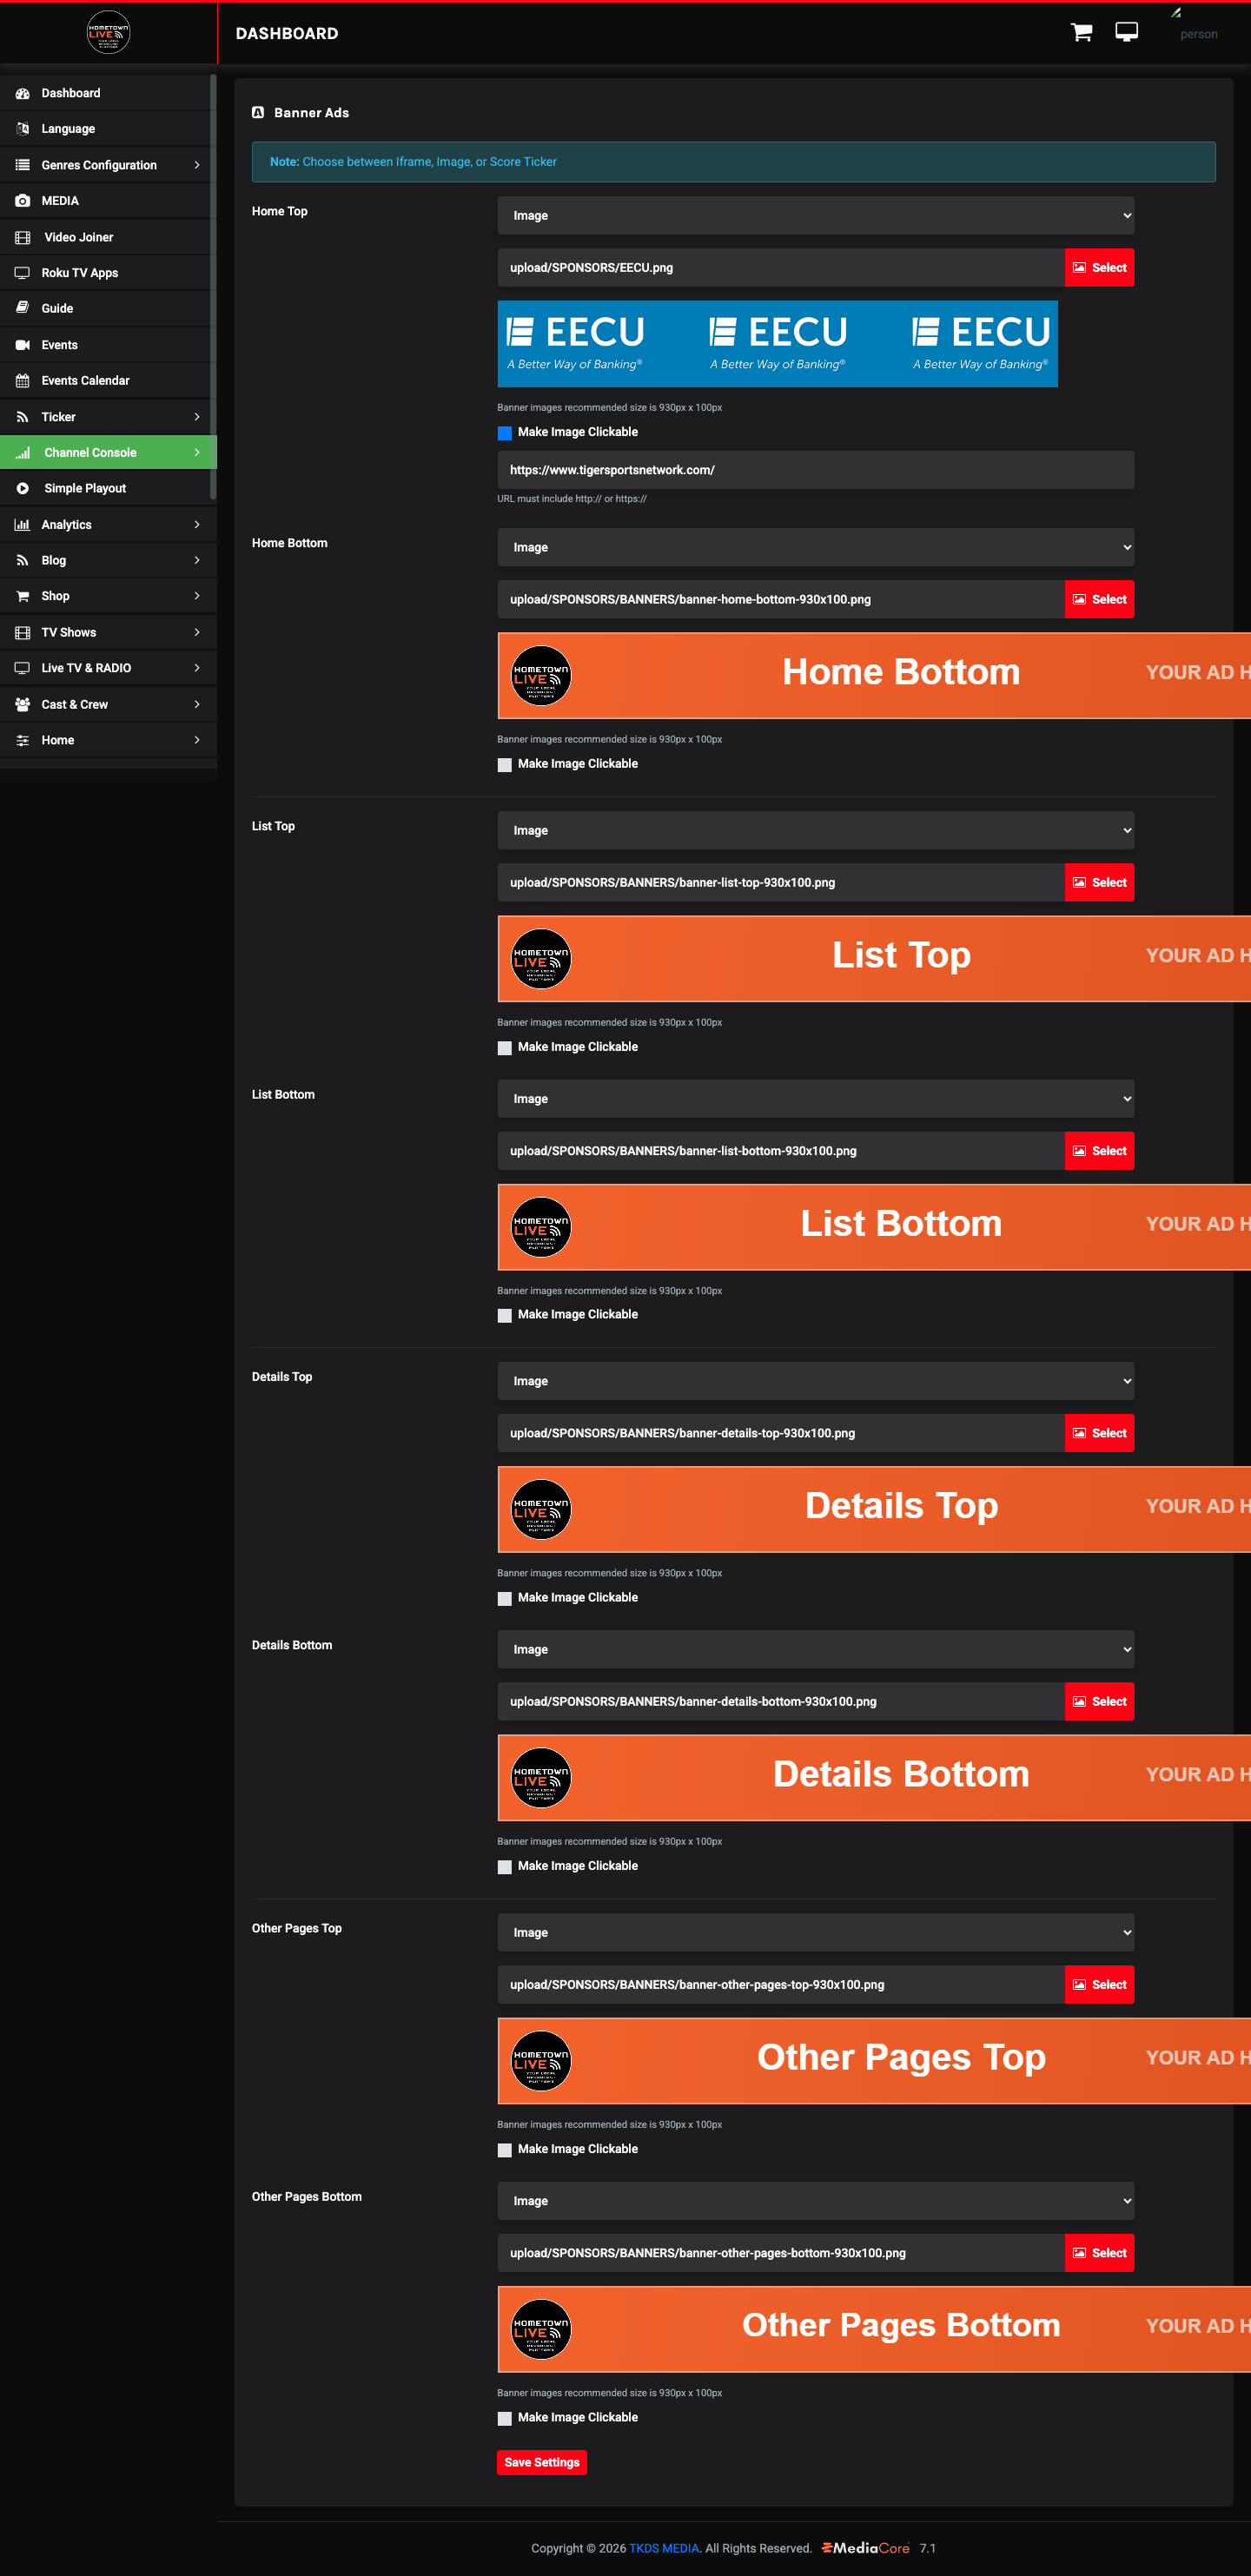
Note: Banner ads appear in 8 positions across the site. Image banners: recommended size 930×100 px.
| Ad Position | Where It Appears |
|---|---|
| Home Top | Above the content on the viewer home page. |
| Home Bottom | Below the content on the viewer home page. |
| List Top | Above the list on Events, Shows, and Live TV list pages. |
| List Bottom | Below the list on Events, Shows, and Live TV list pages. |
| Details Top | Above the content on individual event and show detail pages. |
| Details Bottom | Below the content on individual event and show detail pages. |
| Other Pages Top | Above the content on miscellaneous pages (Blog, Shop, Contact, etc.). |
| Other Pages Bottom | Below the content on miscellaneous pages. |
Each ad position supports the following configuration:
| Field | Description |
|---|---|
| Type | Iframe — embeds an external ad via iframe code. Image — displays an uploaded image file. Score Ticker — embeds a live score ticker from an external source. |
| Upload / URL | For Iframe: paste the iframe embed code. For Image: upload an image file (recommended 930×100 px). For Score Ticker: enter the ticker URL. |
| Make Image Clickable | Toggle On to make the image ad clickable. |
| Click URL | The destination URL when a viewer clicks the image ad. Used when Make Image Clickable is On. |
Tip: Image ads at 930×100 px create a standard leaderboard banner. Coordinate with your sponsors to obtain correctly sized artwork.
Theme Images (/admin/theme_images)
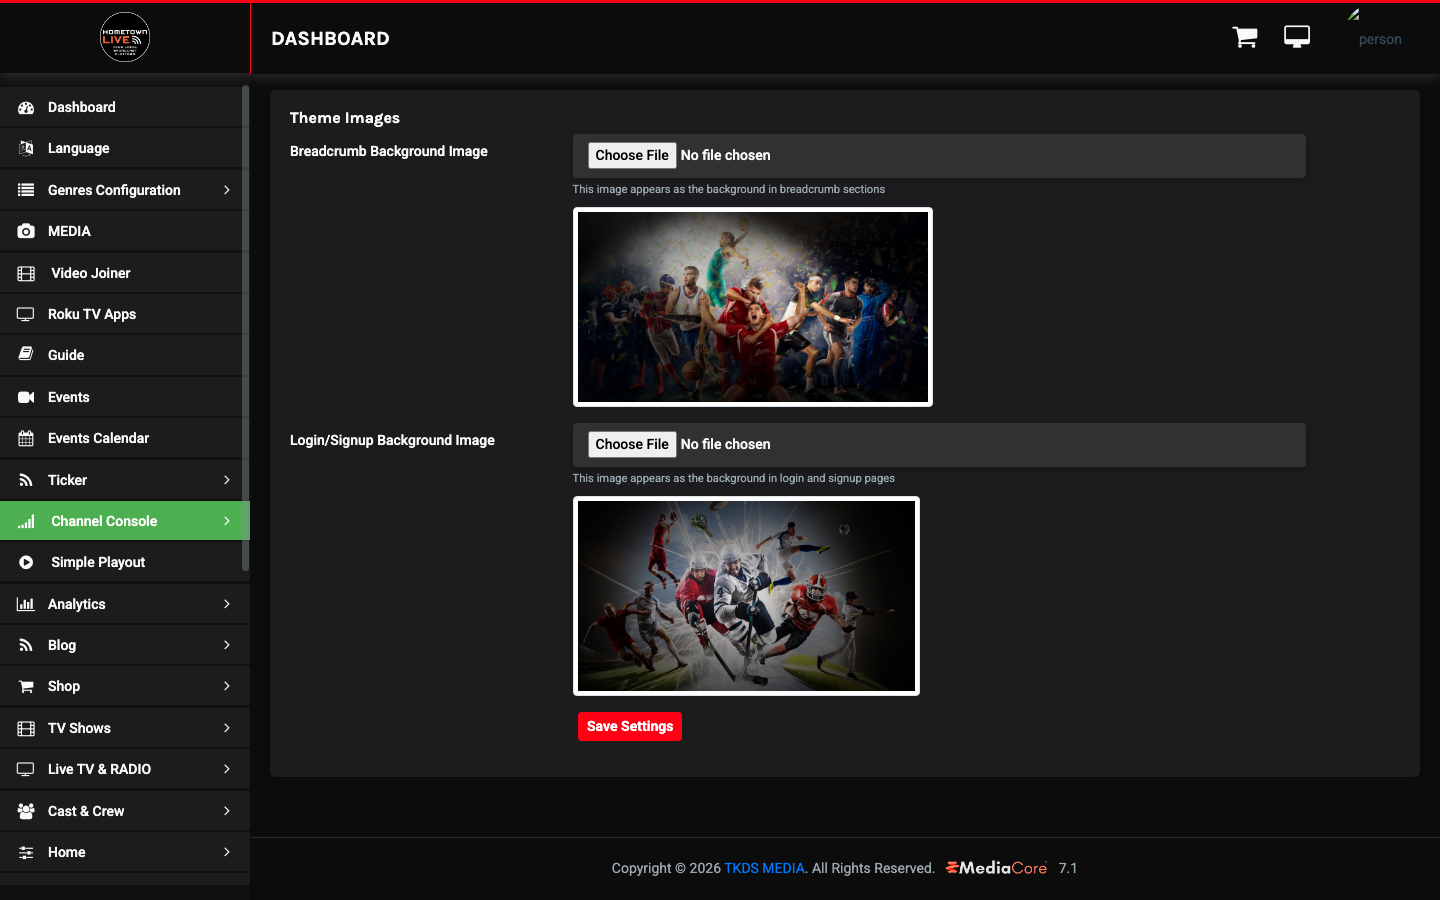
Theme Images configure the background photos used in the breadcrumb area and on the login and signup pages.
| Field | Description |
|---|---|
| Breadcrumb Background Image | The image that appears behind the page title bar on interior pages (Events, Shows, Blog, etc.). |
| Login/Signup Background Image | The image displayed as the background on the login and account creation pages. |
Tip: Use a high-quality action photo from your school or community — a crowd shot, a team on the field, or a performance — to give the platform a personal, local feel.
Theme Colors (/admin/theme_colors)
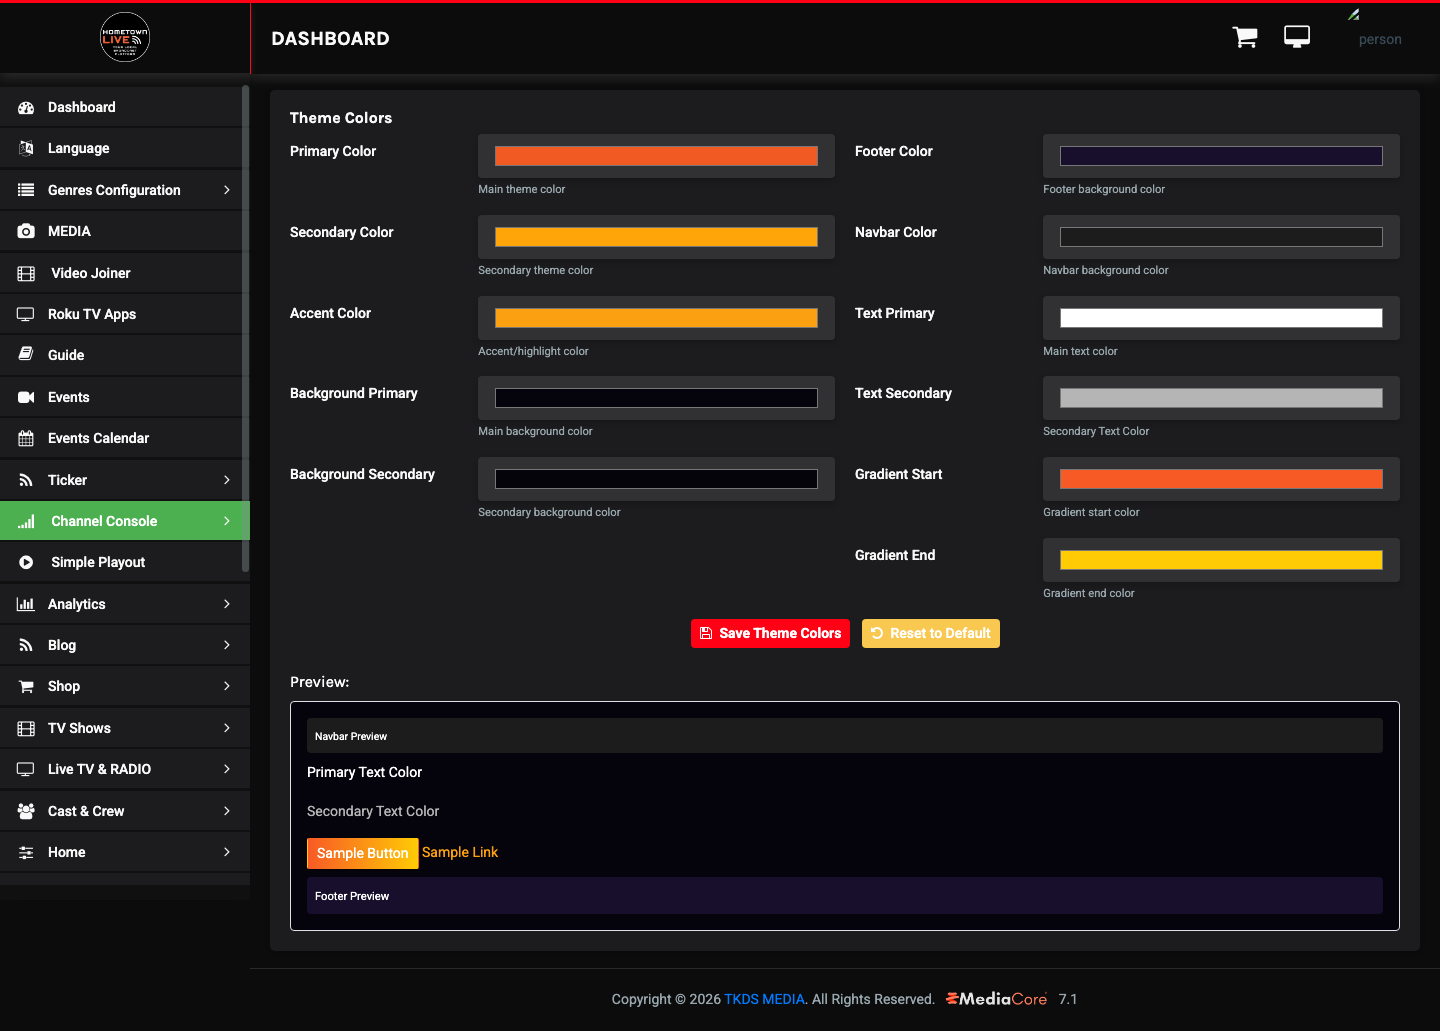
Theme Colors let you match the HometownLive platform to your school's branding. A live preview panel shows how changes look in the Navbar and Footer before saving.
| Color Setting | Description |
|---|---|
| Primary Color | The main brand color used for buttons, links, and accents. |
| Secondary Color | A supporting brand color used for secondary UI elements. |
| Accent Color | A highlight color used for badges, labels, and call-to-action elements. |
| Background Primary | The main page background color. |
| Background Secondary | The background color for cards, panels, and sidebar areas. |
| Footer Color | The background color of the site footer. |
| Navbar Color | The background color of the top navigation bar. |
| Text Primary | The main body text color. |
| Text Secondary | The secondary text color for captions, labels, and metadata. |
| Gradient Start | The starting color for gradient elements throughout the UI. |
| Gradient End | The ending color for gradient elements. |
After making changes, the live preview at the bottom of the page shows a Navbar Preview and a Footer Preview using your selected colors.
Click Reset to Default to restore the original platform colors.
Tip: Set your school's primary and secondary colors first, then adjust background and text colors for readability. The live preview lets you verify contrast before saving.
Warning: Low contrast between text and background colors can make content unreadable for viewers with visual impairments. Verify that your text colors have sufficient contrast against their backgrounds.
Site Maintenance (/admin/site_maintenance)
Site Maintenance mode temporarily blocks all viewer access to the platform and displays a custom maintenance message. This is useful during upgrades, content reorganization, or emergency situations.
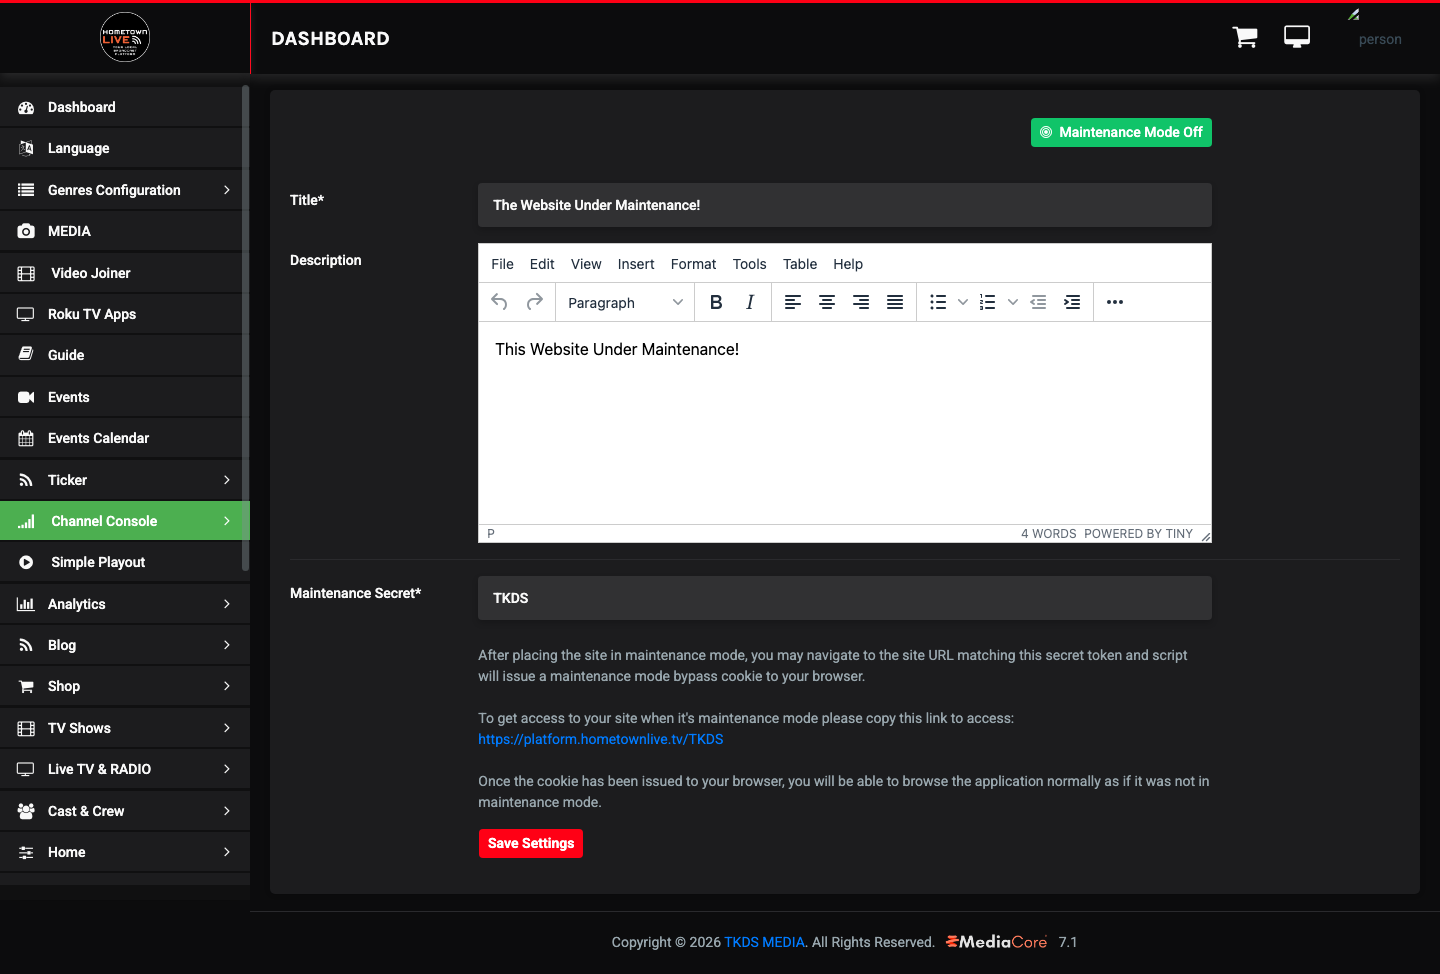
Warning: Enabling Maintenance Mode immediately blocks all viewer access to the site. Only admins with the bypass cookie can view the site while maintenance mode is active.
| Field | Description |
|---|---|
| Maintenance Mode | On/Off toggle. Enabling this blocks all viewer access immediately. |
| Title | The heading displayed on the maintenance page viewers see. |
| Description | A rich text message explaining the outage. Include an expected return time if known. |
| Maintenance Secret | A bypass token that allows admins to view the live site during maintenance. Append this to https://platform.hometownlive.tv/TKDS to receive a bypass cookie. |
Enabling Maintenance Mode
- Enter a clear Title and Description before enabling maintenance mode.
- Note your Maintenance Secret before enabling.
- Click On for Maintenance Mode.
- Verify the maintenance page is showing by opening the viewer site in a browser where you are not logged in as admin.
Bypassing Maintenance Mode as an Admin
- Open a browser and navigate to
https://platform.hometownlive.tv/TKDSwith your Maintenance Secret appended. - The platform grants a bypass cookie to this browser session.
- You can now view the live site while it remains in maintenance mode for other visitors.
Note: The bypass cookie is tied to a single browser session. If you switch browsers or clear cookies, you will need to visit the bypass URL again.
Disabling Maintenance Mode
- Go to Settings → Site Maintenance.
- Click Off for Maintenance Mode.
- Verify the viewer-facing site is accessible again.
Video Player Settings (/admin/player_settings)
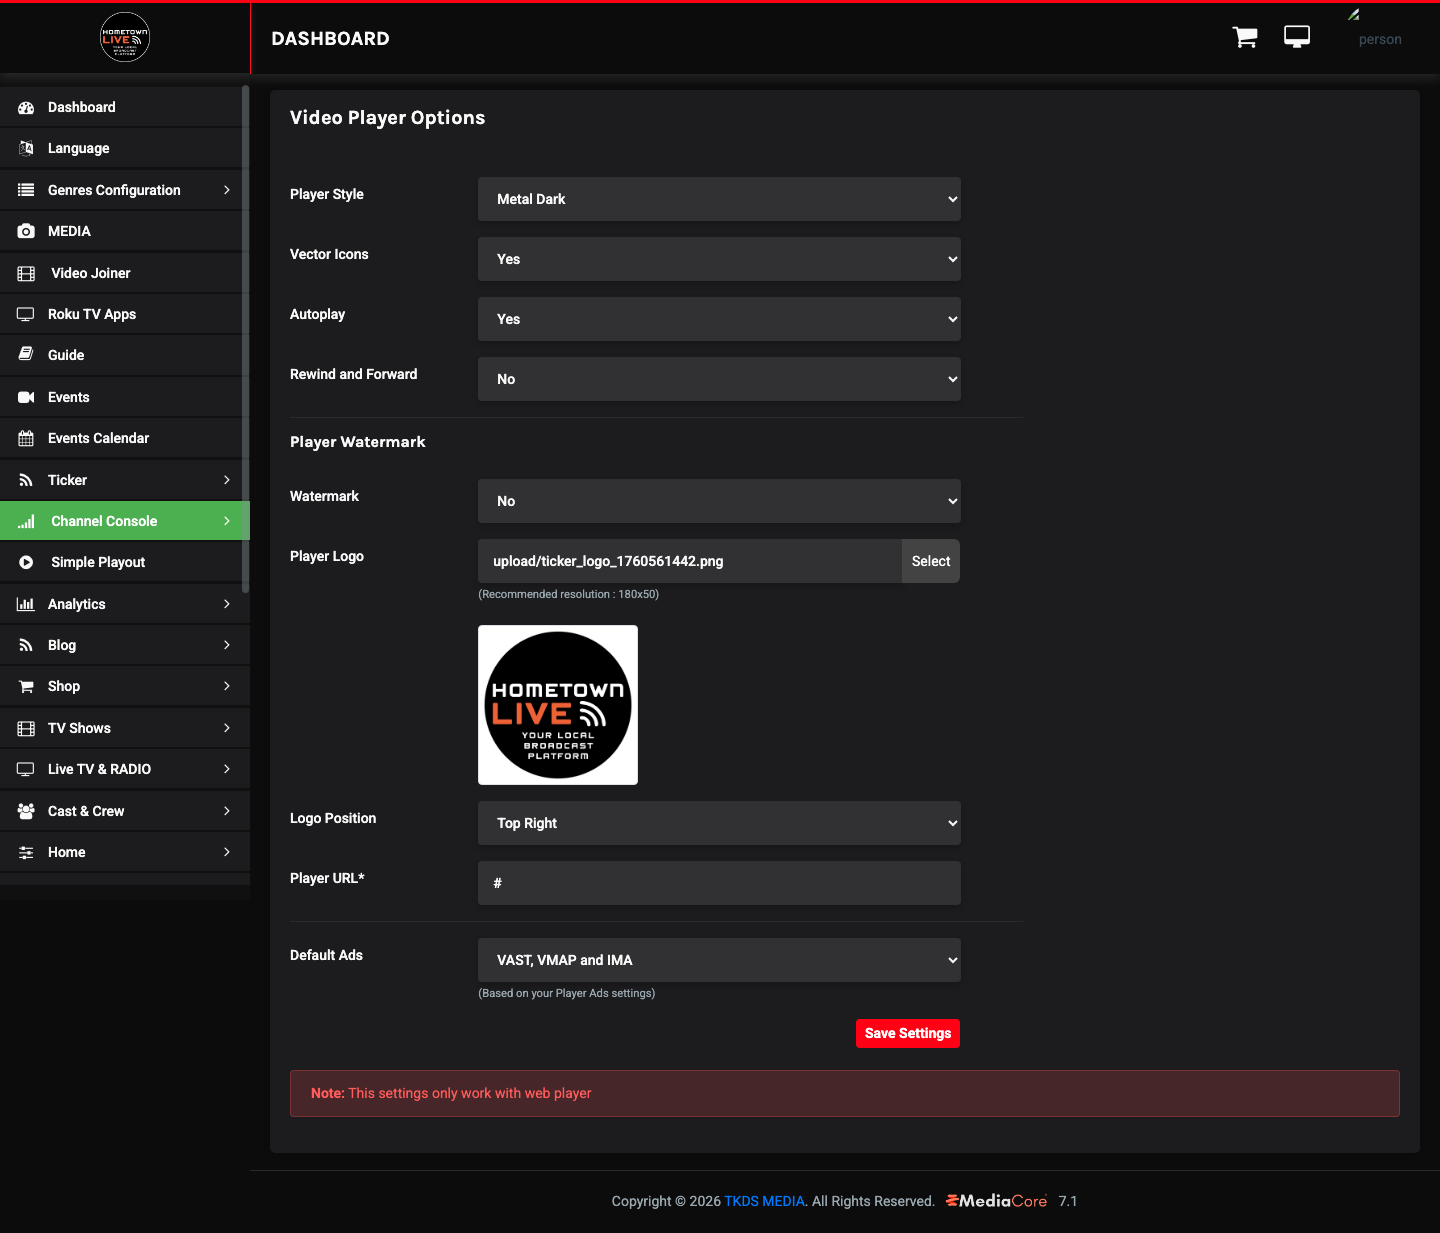
Player Settings configure the appearance and behavior of the embedded video player used throughout the platform.
| Field | Options | Description |
|---|---|---|
| Player Style | Classic Dark / Metal Dark / Minimal Dark / Modern Dark | The visual theme of the video player. All styles are dark-mode variants. Modern Dark is the most contemporary look. |
| Vector Icons | No / Yes | Use vector SVG icons for player controls. Yes provides sharper icons on high-resolution displays. |
| Autoplay | Yes / No | Whether video begins playing automatically when a viewer opens a channel or event. Note that most browsers block autoplay of unmuted video. |
| Rewind and Forward | No / Yes | Display rewind and forward skip buttons in the player controls. |
| Player Watermark | No / Yes | Display a logo watermark overlay on the video during playback. |
| Player Logo | Image upload | The logo image shown as the watermark. Recommended size: 180×50 px. |
| Logo Position | Top Right / Top Left / Bottom Right / Bottom Left | Corner placement of the watermark logo on the video frame. |
| Player URL | Domain URL | The domain used when generating shareable player links. |
| Default Ads | None / Built-in Advertisement / VAST+VMAP+IMA | The default advertising system applied to the player. Can be overridden per channel or event. |
Tip: Use the Modern Dark player style with your school logo as a watermark to create a professional, branded viewing experience.
Player Ads (/admin/player_ad_settings)
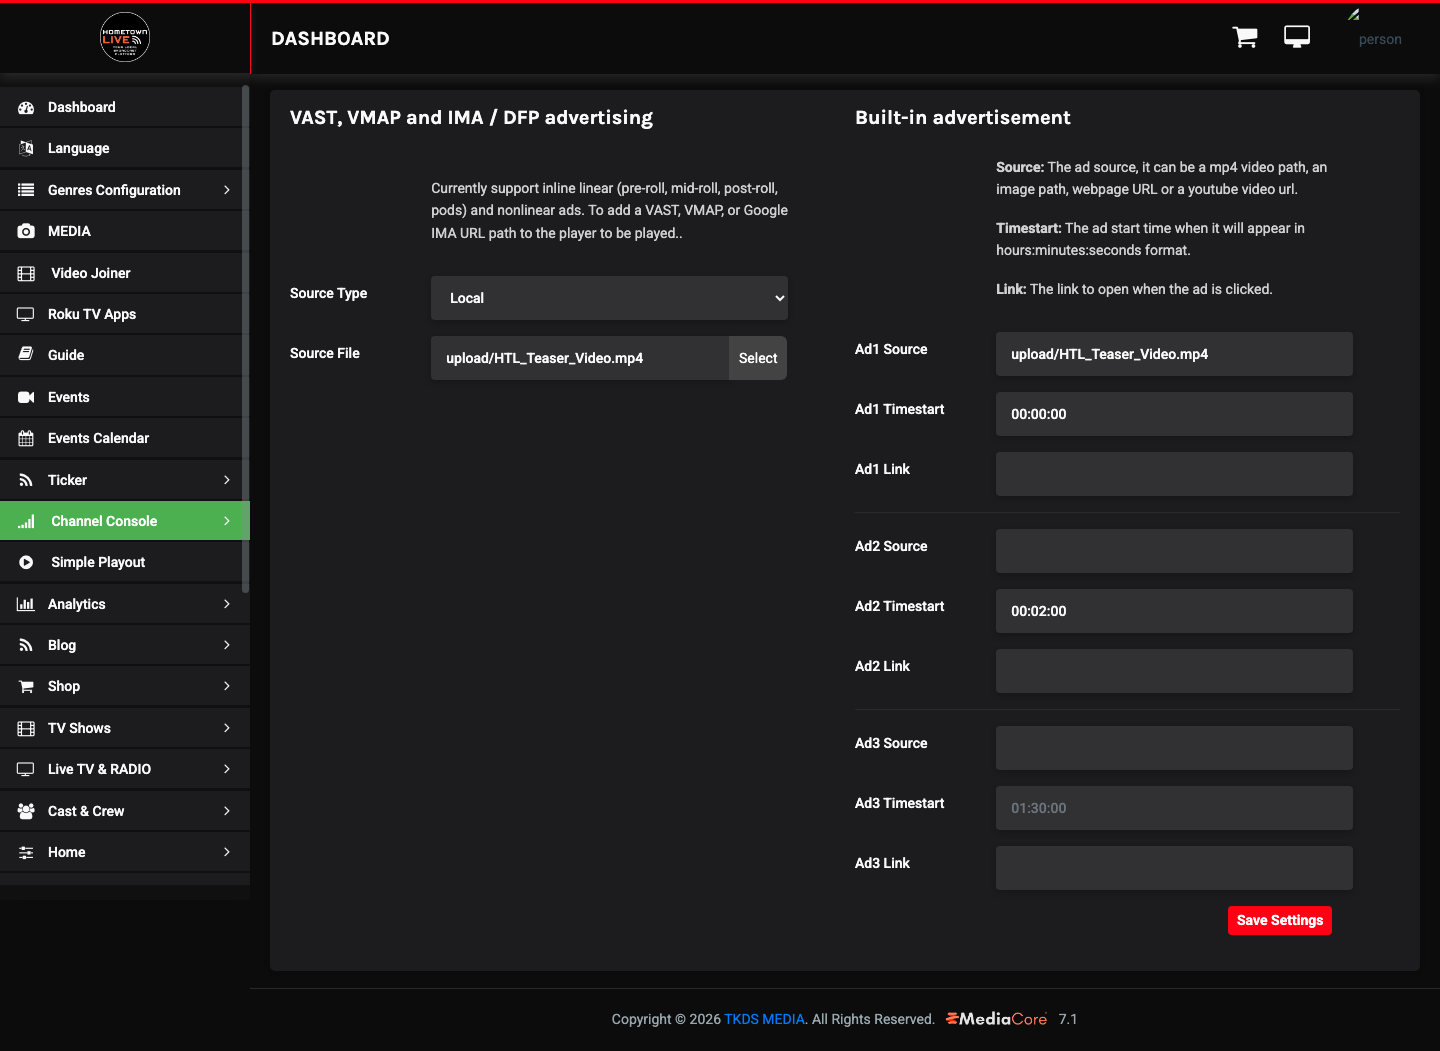
Player Ads configure the advertising systems that deliver ads within the video player. The platform supports two independent ad systems.
VAST, VMAP, and IMA/DFP Advertising
VAST/VMAP is an industry-standard ad system supporting pre-roll, mid-roll, post-roll, and nonlinear ads from ad networks like Google Ad Manager (DFP).
| Field | Description |
|---|---|
| Source Type | Local — upload an ad file directly. URL — enter the VAST/VMAP tag URL from your ad server. |
| Source File | Upload an ad file (if Local) or enter the VAST/VMAP tag URL (if URL). |
Note: VAST/VMAP advertising requires a compatible ad server such as Google Ad Manager. Contact your ad network for a VAST tag URL.
Built-in Advertisement
The built-in system supports up to three custom ads without an external ad server. Each ad can be a video file, image, webpage, or YouTube URL.
| Field | Description | Notes |
|---|---|---|
| Source | Path to the ad content: mp4 file path, image path, webpage URL, or YouTube URL. | Use this to run sponsor messages, school announcements, or promotional clips. |
| Timestart | The point in the video (HH:MM:SS) when the ad appears. | Set to 00:00:00 for a pre-roll ad that plays before the main content. |
| Link | A click-through URL that opens when a viewer clicks the ad. | Optional. Leave blank for ads with no landing page. |
Tip: Use the built-in advertisement system for school-produced sponsor acknowledgments. A 15-second sponsor message at the start of a broadcast is a straightforward sponsorship deliverable.
Language, Genres, Conferences, and Groups
These settings define the metadata taxonomy that organizes content and enables viewer filtering.
Language (/admin/language)
Language entries define the language options that can be assigned to content. Each language can have ads independently enabled or disabled.
| Field | Description |
|---|---|
| Name | The language label displayed in content filters (e.g., English, Spanish). |
| Status | Active languages are available as a filter on the viewer-facing Events page. |
| ads_on_off | Toggle whether ads are shown on content tagged with this language. |
Genres (/admin/genres)
Genres categorize content by type. The default genres are Athletics, Fine Arts, and News. These match the genre filter on the viewer-facing Events page.
| Field | Description |
|---|---|
| Name | The genre label displayed in content filters (e.g., Athletics, Fine Arts, News). |
| Status | Active genres are available as a filter on the viewer-facing Events page. |
| ads_on_off | Toggle whether ads are shown on content assigned to this genre. |
Conferences (/admin/conferences)
Conferences organize content by competitive grouping or program area (e.g., Varsity Football, Marching Band, JV Basketball). Assign a conference when creating events to improve organization and filtering.
Groups (/admin/groups)
Groups represent student organizations, booster clubs, or community organizations (e.g., DECA, HOSA, Baseball Boosters). Groups can be assigned to content for additional organizational structure.
Note: Genres, Conferences, and Groups all share the same structure: Name, Status, and ads_on_off. Create the entries you need before creating content that references them.
Tutorials (/admin/how-to-work)
The Tutorials section provides embedded video walkthroughs for common admin tasks. These tutorials are accessible only to logged-in admins and are a useful first stop when setting up or troubleshooting the platform.
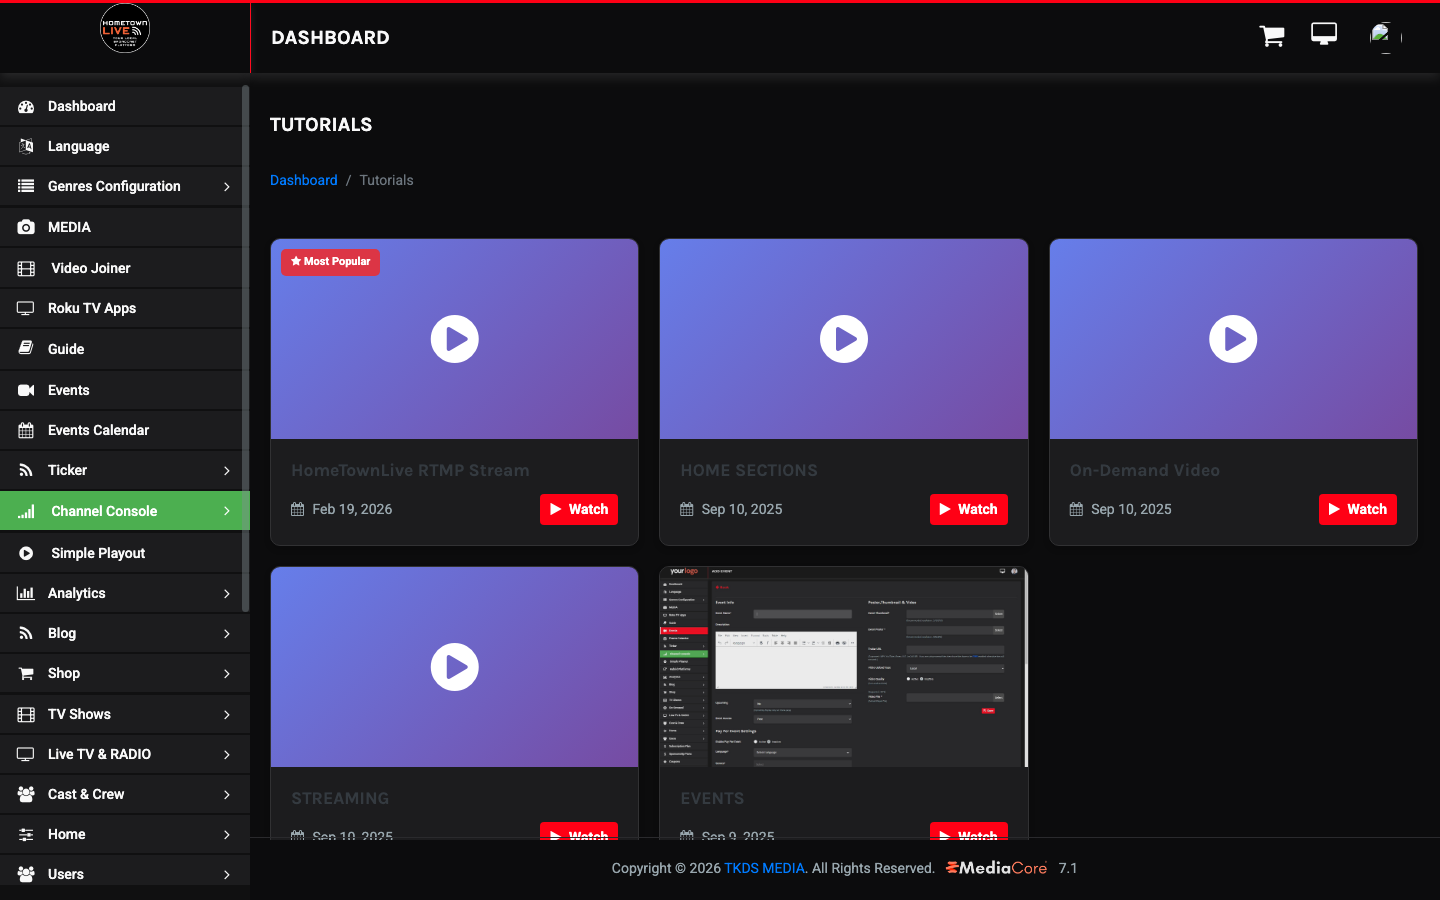
Available tutorials:
| Tutorial Title | Published |
|---|---|
| HomeTownLive RTMP Stream | February 19, 2026 |
| HOME SECTIONS | September 10, 2025 |
| On-Demand Video | September 10, 2025 |
| STREAMING | September 10, 2025 |
| EVENTS | September 9, 2025 |
Tip: Watch the STREAMING and EVENTS tutorials before configuring your first live broadcast. They provide the most complete walkthrough of the end-to-end setup process.
Tools (/admin/tools)
The Tools section provides download links and resources for streaming apps and setup guides. Items are organized into four categories: Apps, Files, Links, and Articles.
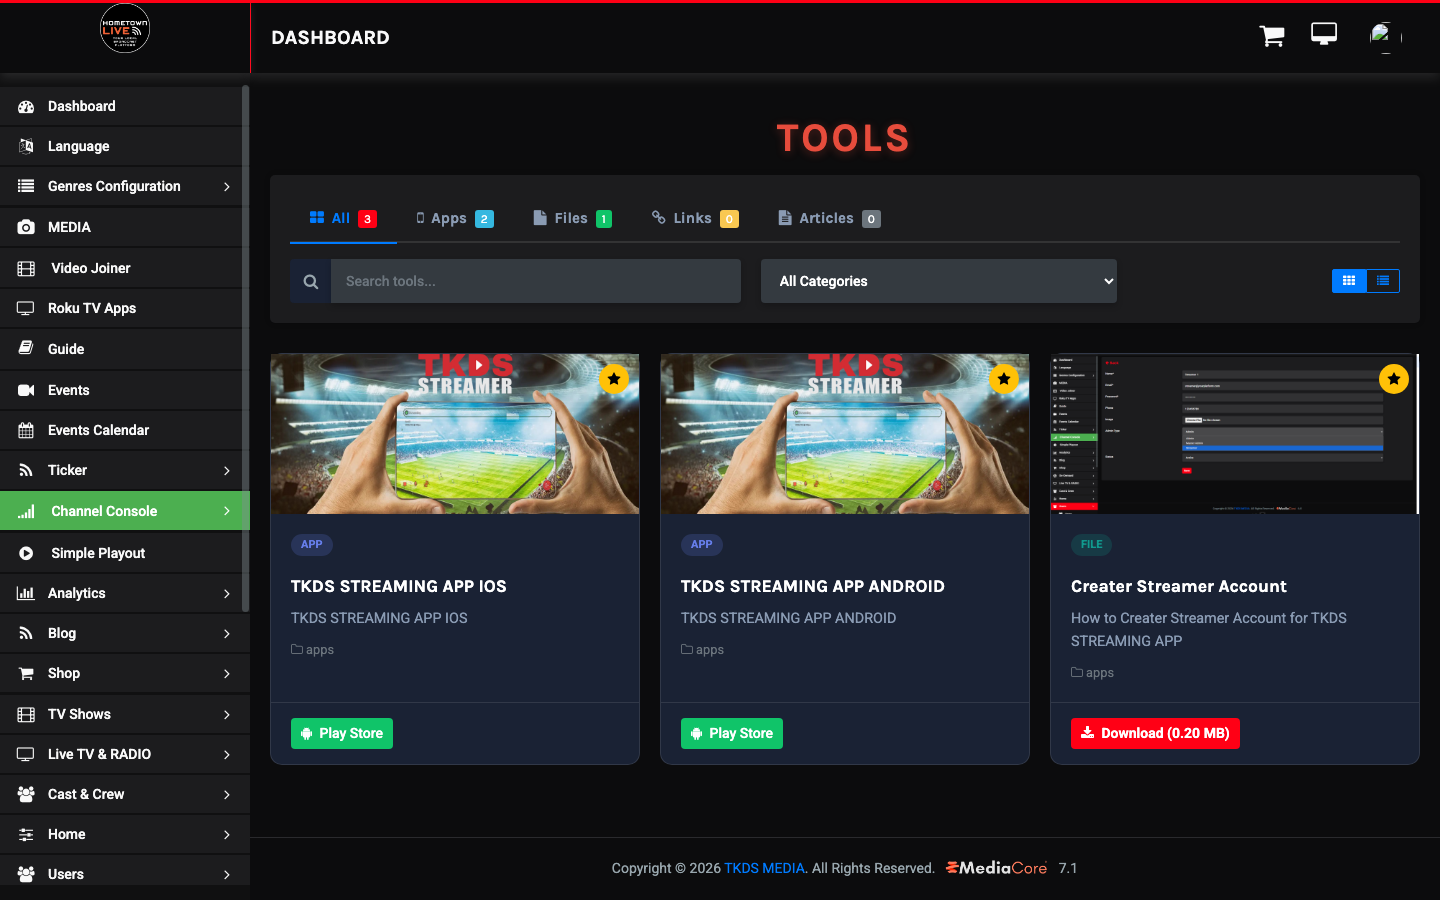
| Item | Description | Category |
|---|---|---|
| TKDS Streaming App iOS | Link to the TKDS Streaming App on the Apple App Store. | Apps |
| TKDS Streaming App Android | Link to the TKDS Streaming App on the Google Play Store. | Apps |
| How to Create Streamer Account for TKDS Streaming App | PDF guide (0.20 MB) with step-by-step account creation instructions. | Files |
Pages (/admin/pages)
The Pages section manages static content pages on the viewer-facing site. These pages appear in the site footer and are used for legal, informational, and contact content.
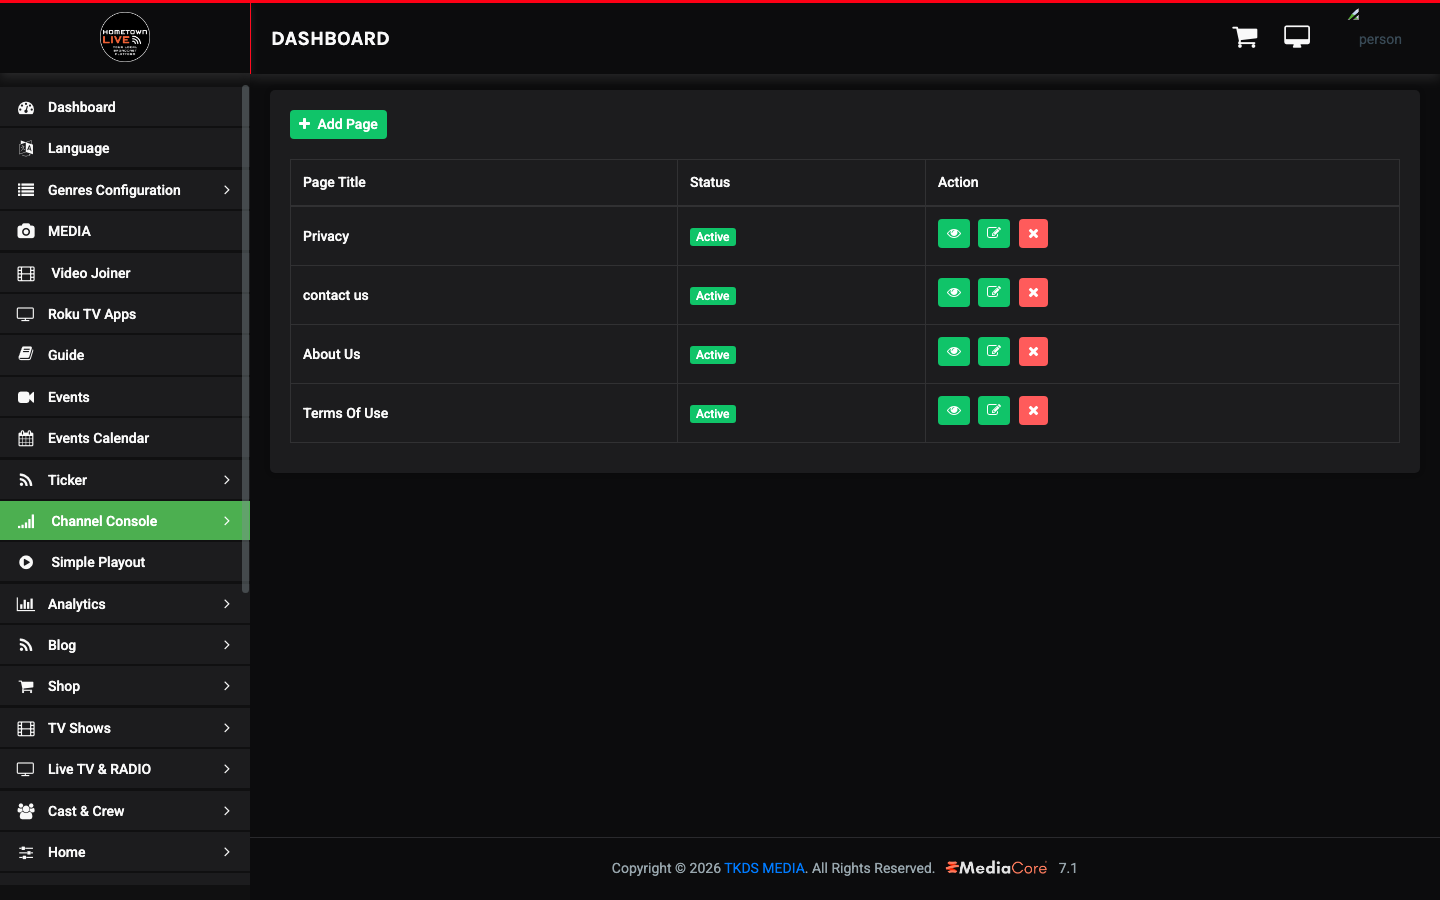
Default pages included with the platform:
- Privacy — Your organization's privacy policy.
- Contact Us — The viewer contact form.
- About Us — Information about your organization and broadcast program.
- Terms Of Use — Terms and conditions for platform use.
Adding a Page
- Click Add Page.
- Enter a Title for the page.
- Write the page Content in the TinyMCE rich text editor.
- Set a Page Order number to control the footer display sequence.
- Set Status to Active.
- Click Save.
Editing a Page
- Click Action → Edit for the page you want to update.
- Make changes in the TinyMCE editor.
- Click Save.
Note: The Contact Us page includes a built-in form. Editing the page content changes only the text shown above or around the form — the form fields themselves are managed by the platform.
Tip: Keep your Privacy and Terms Of Use pages current. If your school or district has a legal department, have them review these pages before the platform goes live.
Still need help?
Can't find what you're looking for? Our support team is here to help.
Contact Support →